A Guide to connecting your BI Tools to Snowflake using OAuth

Earlier this year, Snowflake announced plans to block single-factor authentication. Due to client feedback regarding the complexity of migrating all authentications in the original timeline, Snowflake have extended the final enforcement date to October 2026. If you are still using individual username-password authentication, this blog series is here to help you migrate in time!
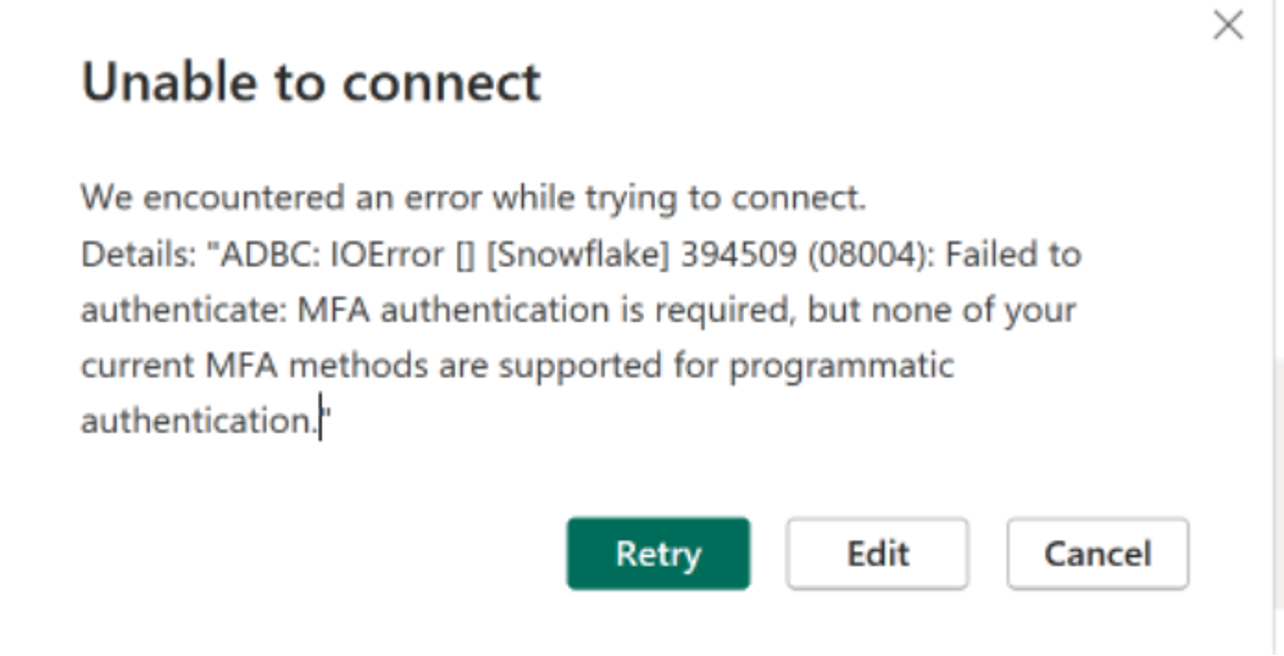
What does enforcement look like? When the deadline is finally enforced, BI developers won’t be able to use their personal Snowflake login credentials when developing in BI tools, even if they have MFA enabled, finding errors like this:
You now have three options to authenticate your BI tools (maybe fewer depending on your BI tool of choice): OAuth, RSA key pairs, or PAT tokens. In this blog series, we will explore these three connection options for some of the most popular BI tools.
Looking for Programmatic Access Tokens (PAT) or RSA? Check out our other blogs:
- Breaking Up with Single-Factor: A Guide to connecting your BI Tools to Snowflake using Programmatic Access Tokens
- Breaking Up with Single-Factor: A Guide to connecting your BI Tools to Snowflake using RSA Key-Pairs
What is OAuth?
OAuth is an authorization protocol designed to allow a website or application (like your BI tool) access resources hosted by other web apps (like Snowflake). It allows users to grant third-party services access to data without exposing their credentials.
Connections authenticated with OAuth allow your users to read data and use write-back features like input tables, warehouse views, materializations, and CSV uploads with their own individual credentials instead of a service account, which may be desirable for certain data governance use cases.
Setting up OAuth in Snowflake
Depending on your BI tool, you will have to do one of the following:
- Tableau Desktop, Cloud, as well as Tableau Server versions 2023.3 and older.
- Looker
- Domo
- Sigma
- PowerBI
- Tableau Server versions 2024.2 and beyond.
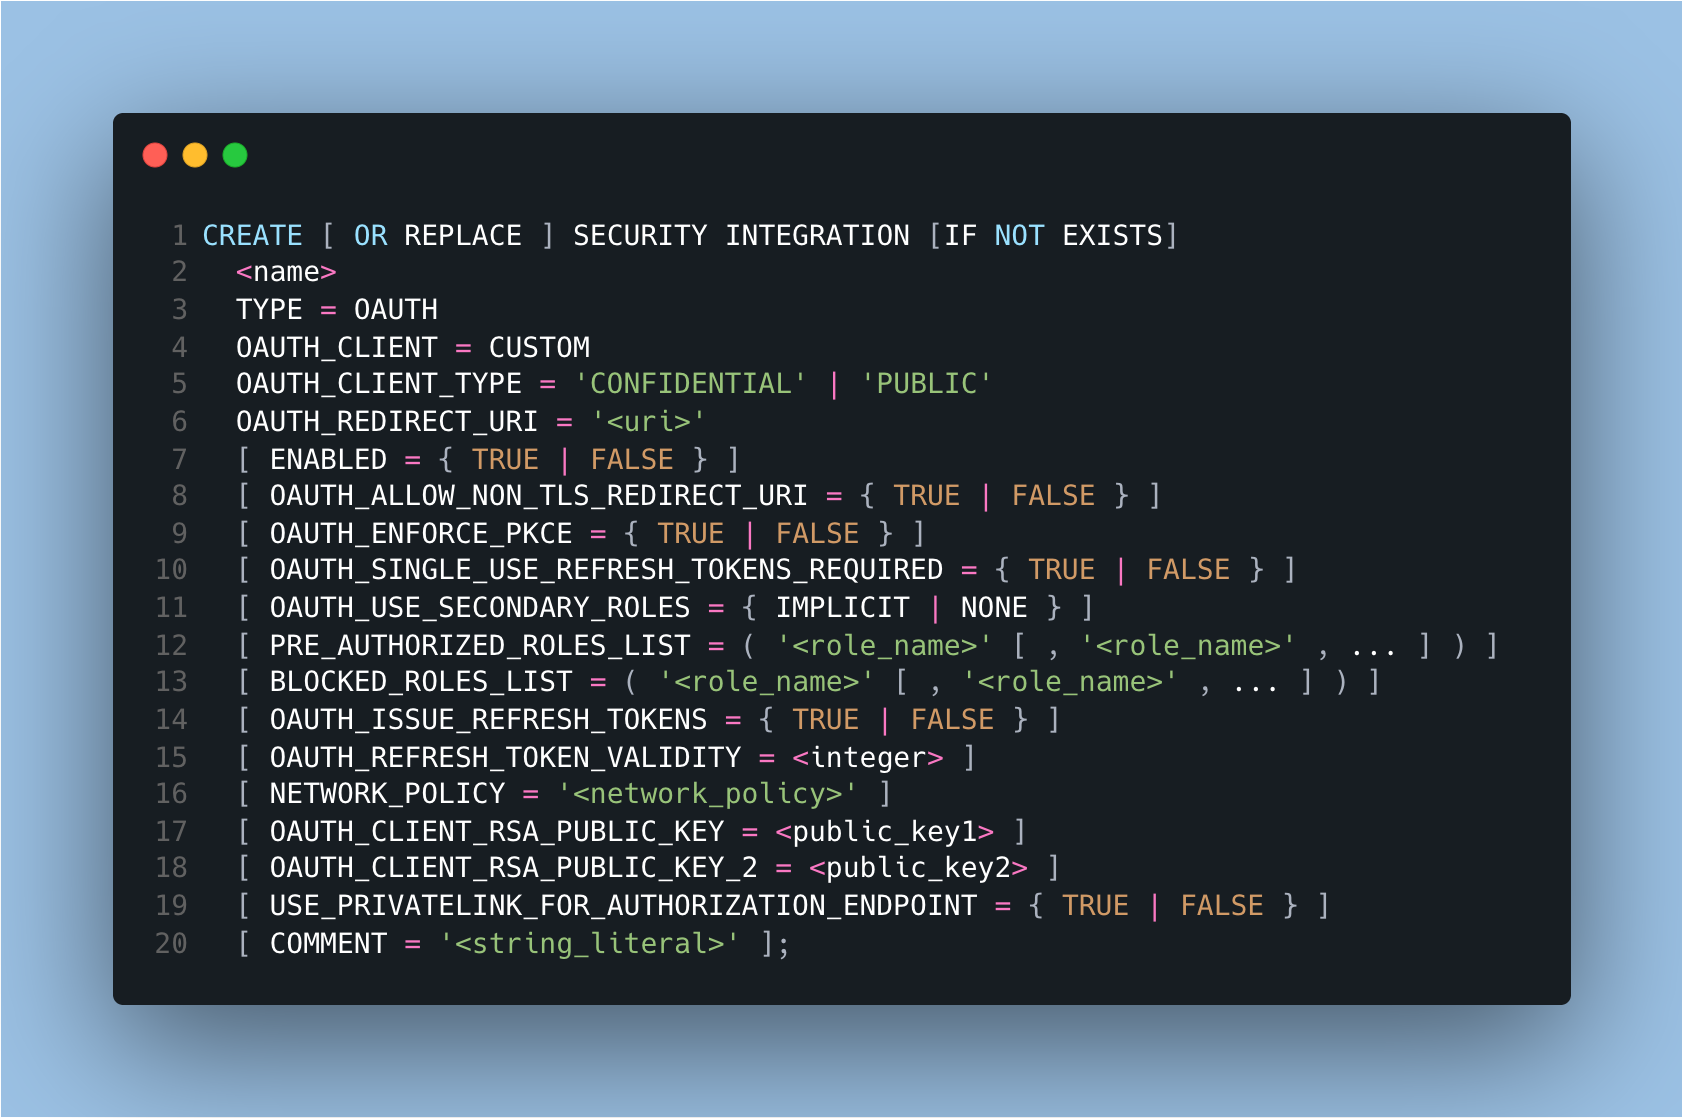
To create a Snowflake connection to any BI tool using OAuth, you must set up the OAuth integration in Snowflake. This requires a Snowflake user account with ACCOUNTADMIN permission. The command will vary depending on whether the connection required OAuth or External OAuth. We will include the command for each BI tool in the steps below.
Using OAuth in your BI tool
Once you have your OAuth configured in Snowflake, the next steps will be different for each BI tool, and configuration preferences, for example if you will be using an Identity Provider (IdP). Here we have detailed the steps for some of the most popular BI tools that our clients use.
How to use OAuth in Tableau
If you are using Tableau version 2024.2 or later you will need to configure the custom integration to Tableau and register OAuth for Snowflake connections: See full docs here.
If you are using Tableau Server versions 2023.3 and older, the connector will handle the connection.
Once it’s configured, you can set up the connection by following these steps:
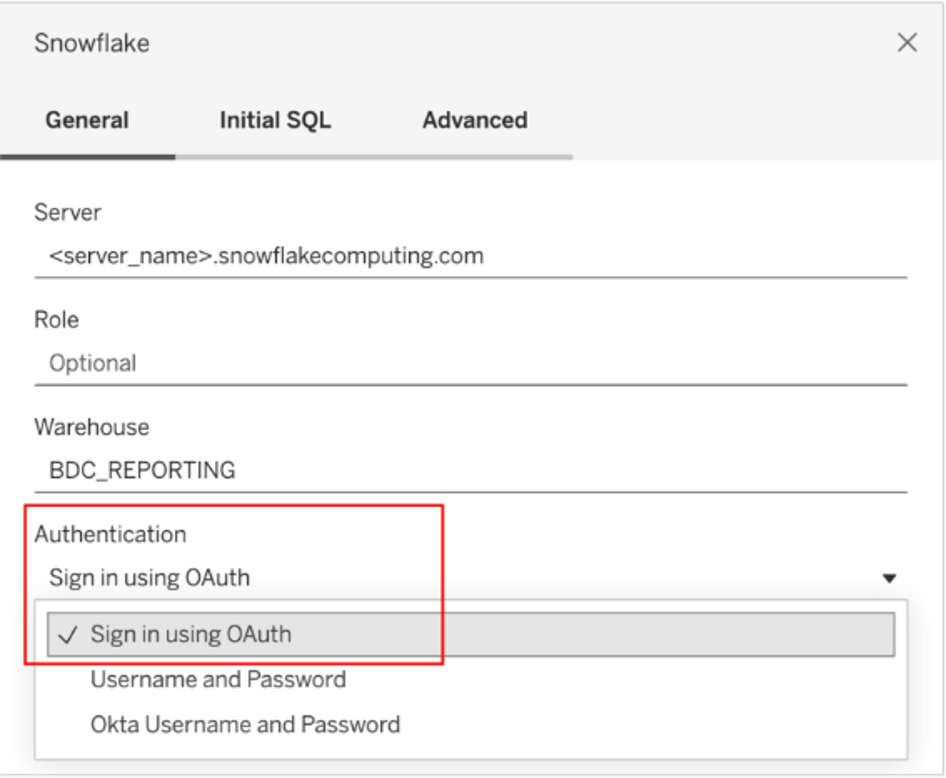
- On the Connect screen, under To a Server, select More, and then select Snowflake.
- On the General tab, enter the name of the server that you want to connect to.
- (Optional) Enter the Role and Warehouse.
- Select Sign in using OAuth.
- In the Web page that opens, log in to Snowflake by entering your Username and Password and selecting Log In. Alternately, select Single Sign On if Snowflake is configured to support SSO.
- Click OK to confirm authorization to access your Snowflake data.
How to use OAuth in PowerBI
To connect PowerBI to Snowflake using OAuth you have two options:
- Snowflake PowerBI native driver. This is the easiest method, but it supports only Azure AD for OAuth.
- Using a separate IdP. For this you will need to use the Snowflake ODBC driver.
Option 1: Azure AD
- Create the security integration by running this command on Snowflake.
- Sign in to Power BI using Fabric administrator credentials.
- Select Settings from the page header menu, then select Admin portal > Select Tenant settings, then scroll to locate Integration settings, and enable SSO.
- In PowerBI desktop, Select Get Data from the Home ribbon, select Database from the categories on the left, select Snowflake, and then select Connect.
- In the Snowflake window that appears, enter the name of your Snowflake server in Server (It will be: <account_name>
.snowflakecomputing.com) and the name of your Snowflake computing warehouse in Warehouse. - When you are prompted to enter the username and password, select “Microsoft Account” instead.
- In Navigator, select the tables you want to connect to.
- Microsoft Entra ID single sign-on (SSO) only supports DirectQuery, you will not be able to use the “import” option.

Option 2: Snowflake OBDC driver (We will use Okta in this example)
- Download the OBDC driver from Snowflake.
- Configure a system or user DSN and set the parameter Authenticator to EXTERNALBROWSER.
- In PowerBI: Use the ODBC driver for the connection instead of the default Snowflake.
- Select the Data source name (DSN) you created.
- Set the authenticator to EXTERNALBROWSER.
- Enter your Okta username and password.


How to use OAuth in Sigma
Sigma offers two OAuth options:
- Scenario 1: If you are using OAuth to authenticate users to your Sigma organization with an external IdP (Okta, Microsoft Entra ID, Auth0, or PingIndentity) you can re-use that OAuth configuration for the Snowflake connection.
- Scenario 2: If you don’t use OAuth or you don’t want to reuse it, you have the alternative to set up a unique OAuth configuration for this connection.
Scenario 1:
- Navigate to Administration > Connections and click Create Connection.
- Configure a Snowflake connection with your Snowflake account and warehouse. For Authentication select OAuth.
- Enable the toggle next to Use organization-level OAuth configuration. If you do not use OAuth as your authentication method for your Sigma organization, this option will not be present, see Scenario 1.
- If you require a service account for writeback features, this can only be set up with RSA key pair authentication, please see our article on RSA.
Scenario 2:
- Configure a Sigma OAuth application. The process is well documented in Sigma’s documentation here.
- Create the security integration by runnign this command on Snowflake. This is an example using Okta but you can replace okta with your IdP.
- EXTERNAL_OAUTH_TYPE: Specifies the type of external OAuth provider (Okta in this case).
- EXTERNAL_OAUTH_ISSUER: The Issuer URL from your Okta authorization server.
- EXTERNAL_OAUTH_JWS_KEYS_URL: The JWKS URL for fetching the signing keys.
- EXTERNAL_OAUTH_AUDIENCE_LIST: Specifies the expected audience of the OAuth token.
- EXTERNAL_OAUTH_TOKEN_USER_MAPPING_CLAIM: The claim in the OAuth token that maps to the Snowflake user (usually sub for subject).
- EXTERNAL_OAUTH_SNOWFLAKE_USER_MAPPING_ATTRIBUTE: The Snowflake email attribute to map the OAuth claim to email address, but this can be customized based on your setup.
- EXTERNAL_OAUTH_ANY_ROLE_MODE: Enables or disables the ability for the user to assume any role specified in the token.
- Log into Sigma as Administrator and navigate to Administration > Authentication. Click Edit.
- In the Metadata URI field, enter the OAuth metadata URI you obtained in step 1.
- In the Redirect URI field, use the copy icon to copy the redirect URI to your clipboard, to use when configuring your OAuth configuration in your IdP.
- In the Client ID field, enter the client ID from your OAuth application that you obtained in step 1.
- If you configured your application in step 1 to require Proof Key for Code Exchange (PKCE) or JWT bearer tokens, check the corresponding box. Otherwise, In the Client Secret field, enter the client secret from your OAuth application that you obtained in step 1.
- Navigate to Administration > Connections and click Create Connection.
- Configure a Snowflake connection with your Snowflake account and warehouse. For Authentication select OAuth.
- If you require a service account for writeback features, this can only be set up with RSA key pair authentication, please see our article on RSA.


How to use OAuth in Omni
At the time of this article, Omni doesn’t support OAuth on Snowflake. This is an upcoming feature. Please see our article on RSA Key Pairs which Omni does support.
How to use OAuth in Domo
- Configure the Snowflake security integration
- Run this command to obtain the client ID and secret.
- Navigate to the Data Warehouse and select Add New Cloud Integration on the canvas.
- In the modal, select Snowflake. Then click Add new integration on the bottom right.
- Enter the Integration name — A unique name to help you identify the integration in Domo. If configuring OAuth, this name is how Domo users view the reference to the Snowflake native connection. It is not the same as the integration name, and has no impact for Snowflake.
- In Snowflake connection URL enter your Snowflake URL with format: <orgname>-<account_name>
.snowflakecomputing.com. - In the username and private key file sections, enter your service user credentials. These must be RSA key pairs. Please see our article on RSA for details.
- Under Configure OAuth, toggle the switch to enable OAuth. Under Client ID and Client secret enter the values you obtained from snowflake earlier.
- Choose the Snowflake role and Click Authenticate.
- Enter your snowflake credentials, and allow the integration.
- Adjust how frequently Domo should check for updates and click Next.
- Select the warehouse and click next to finalize the connection.


How to use OAuth in Looker
Please note that PDTs are not supported for Looker to Snowflake connections that use OAuth, if you use PDTs we recommend you use RSA for your connection. Please see our article on RSA tokens for connection instructions.
- Set up the OAuth integration in Snowflake. Run the following command in Snowflake, where <looker_hostname>
is the hostname of your Looker instance: - Get the OAuth client ID and secret by running the following command. The response will have an OAUTH_CLIENT_ID and OAUTH_CLIENT_SECRET that you will need later in this procedure.
- In the Admin section of Looker, select Connections, and then click Add Connection.
- In Database Settings - Host: Enter the Snowflake hostname. It will be: <account_name>
.snowflakecomputing.com. - In Database Settings - Authentication Method: Select OAuth.
- Paste in the OAUTH_CLIENT_ID and OAUTH_CLIENT_SECRET values that you got from your database.


OAuth is just one of the options you have to authenticate your BI tool connection to Snowflake. Please check out our other blogs on PAT and RSA Key pairs to see other secure alternatives, or to see how to set up your service user.
Need help setting up your snowflake to BI connection fast before the deprecation deadline? Contact us, we are already helping our clients switch their connection.